How to set up and use Microsoft SharePoint
Q. I have been using a file server for years. I want to transition my files to the cloud, but I do not want to cause problems. What is a good option?
A. Transitioning to cloud file storage may seem like a big endeavor, but there are ways to make that leap with minimal disruption. The option I discuss in this column is Microsoft SharePoint. SharePoint is a multipurpose tool that is designed to be an internal website also called an “intranet.” I demonstrate how I set up and use SharePoint as a cloud file storage connected to my computer’s File Explorer. I also touch on some of the other features, including live collaboration and search.
To start, I created my SharePoint site. I logged into Office.com, clicked on the charms menu in the top left (it is the nine dots in a square), and then clicked on SharePoint, as shown in the screenshot below.

Once SharePoint loaded, I clicked on the + Create site in the top left corner. This prompted a series of questions. Here is what I answered for each question:
- Create a site: “Select the site type”: I selected “Team site” because this would be internal.
- Select a template: I selected “Standard team” and clicked the Use Template button.
- Name the Site: I named the site “Clients” and clicked Next.
- Privacy settings: I set the privacy setting to “Public.” This does not mean that it is public to the internet. It means that anyone in my office with a valid login will be able to add themselves to access the site. Depending on the use case, such as a site for human resources, private may be the better option so access can be more restricted.
- Assign Users: I added some staff proactively to give them access and then clicked Finish.
SharePoint then automatically took me to the Home page of the site. I went to the Documents page to begin the file storage setup where I can add new folders and files as well as begin the transfer of my existing files from my file server.

Adding Files
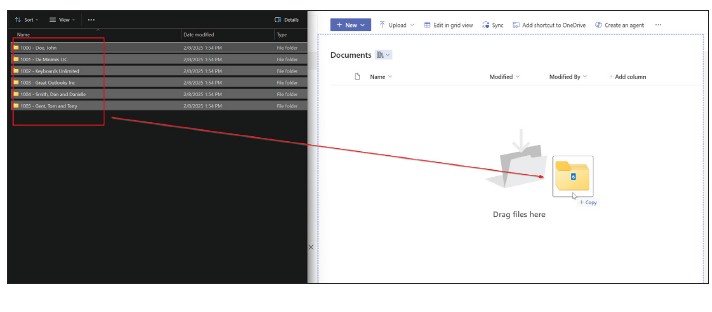
The first thing I wanted to do was add additional options to the “+ New.” By default, the “+ New” button can be used to add new folders to SharePoint to build a folder structure. I wanted to be able to add new files like a blank Word document or a blank Excel file. Those file options do not show up in “+ New.” To add them, I clicked on + New and selected Edit New menu. From the sidebar list, I selected all the checkboxes to add all the options and clicked Save at the top. That made it so when I click + New, I have all file options available to me. I could choose from a few options for adding files and folders. The quickest was to drag from my computer to the browser. The screenshot below shows that I have my client folders in my file server that I want to retire on the left. On the right is the new SharePoint site open in an internet browser. I highlighted the folders on the left File Explorer and dragged them into the SharePoint site. This started uploading all the files and retained the existing folder structure from the file server.
A quick cautionary note, if your file and folder structure is already a disorganized mess, migrating your files to SharePoint will not fix that problem. You will want to clean up your data and organize your files before bringing them into SharePoint. Let’s talk about some of the features that are available with files hosted in SharePoint.
Collaboration
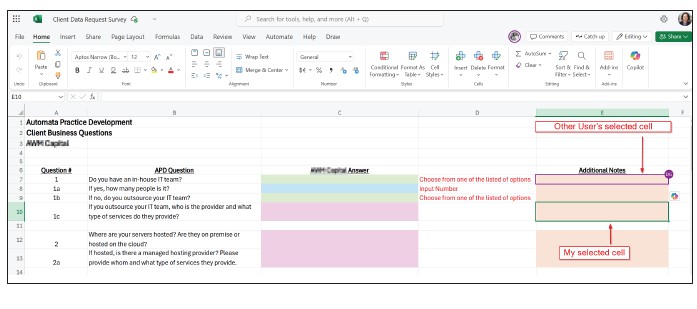
After uploading folders and files, my team can take advantage of SharePoint’s editing and collaboration capabilities. We can click on any folder to drill down and open a file. Clicking on a file will open the file in the online version of the supported software; e.g., click on Excel to open the file in the online Excel. This file can be edited by multiple users at the same time. In the screenshot below, my selected cell is E10 while another user is at cell E7. We can both enter data at the same time.
Search
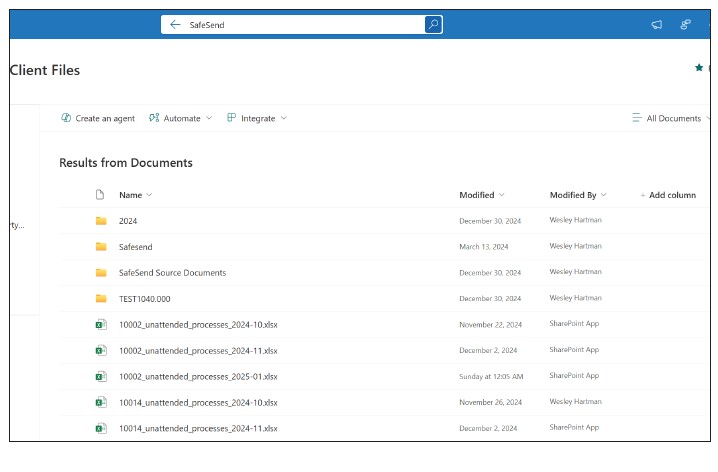
Because SharePoint indexes all files to make them searchable, I can search across all documents and in their contents for a word or phrase. For example, I navigated to Document because I wanted my search to originate from the top of the folder structure. I ran a search for SafeSend using the search bar at the top. This gave me all folders and files where the file name contained “SafeSend” or “SafeSend” was in the contents of the file. The screenshot on the next page shows an example search. Another use case would be if I received a tax notice. I may want to see a similar letter I had previously written. I could run a search to find a prior letter using some keywords or phrases.
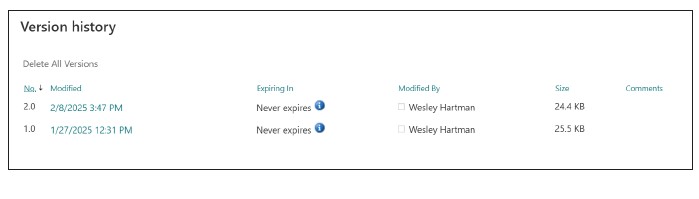
Version history
SharePoint has built-in version tracking. All changes made to a file are tracked and can be referenced. To access a file’s version history, click on the three dots next to a file and click Version history. This will show me all the dates where a change was made to a file.
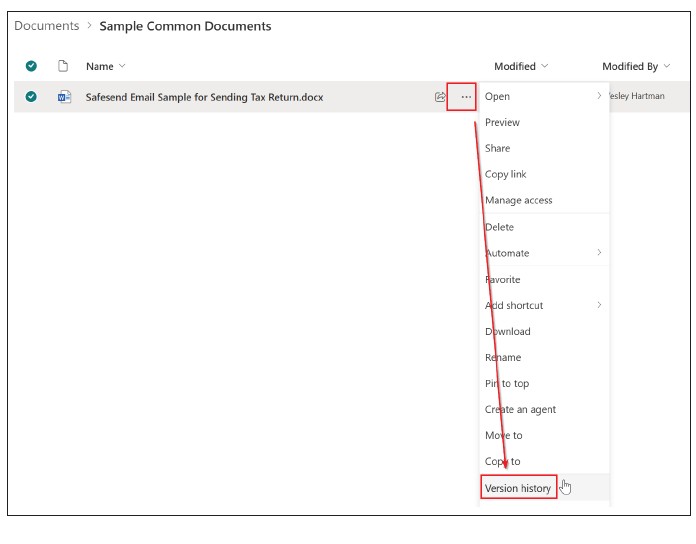
You can open any of these by clicking on the date. Note that this will open in the Word desktop application rather than the online version.
Shortcut to OneDrive
A convenient feature is to have the SharePoint documents link to OneDrive in File Explorer. To set this up, I went to Documents and clicked on Add shortcut to OneDrive.
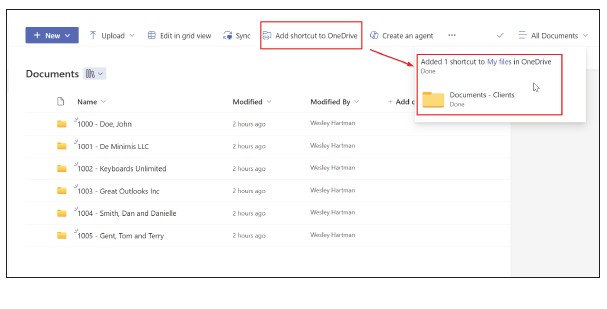
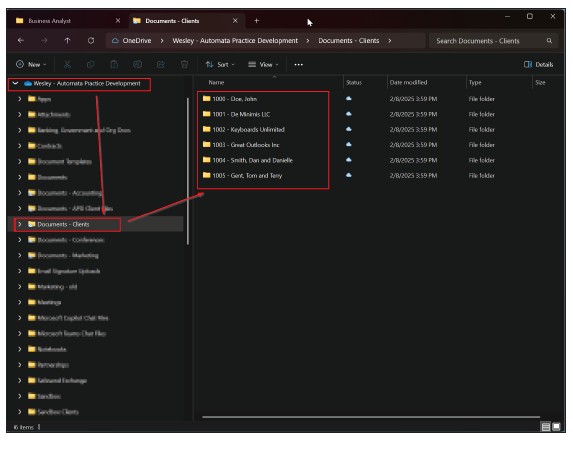
A few seconds later, I had a folder in my OneDrive I could use to navigate the folders and files. Any file I open here will open in its corresponding desktop application. This is my preferred method for interacting with my folders and files in SharePoint.
This is a simple use case, but there are some additional features I want to touch on briefly.
Manage Access: You can manage access on a folder level. As an example, I have a site for the information technology department. The site contains folders with documents that are for internal use and folders with documents that are “how to.” I can place user-level restrictions on the internal use folder to prevent the rest of the staff from accessing those files. The staff can still access other folders, such as how to and instructions.
Automation: With SharePoint set up, you can connect it to automation platforms such as Power Automate or Zapier. A use case is an automation where after bulk printing organizers from your tax software, you can build a Power Automate that will upload the file to the client’s SharePoint folder based on the client number in the file name.
SharePoint licenses have several restrictions, two of which are worth mentioning. The first restriction is space. SharePoint offers 1 terabyte (1,000 gigabytes) of space as well as an additional 10 gigabytes per Office 365 user. Additional space is available for 20 cents per gigabyte per month or $200 per terabyte per month. I would need to keep an eye on our usage as something to be aware of.
The second restriction is file path length. The number of characters in the full file path cannot exceed 400. This includes all subfolders, which makes it important to have a standardized folder structure and inform users to not make too many subfolders.
About the authors
Kelly L. Williams, CPA, Ph.D., MBA, is an associate professor of accounting at the Jones College of Business at Middle Tennessee State University. Wesley Hartman is the founder of Automata Practice Development.
Submit a question
Do you have technology questions for this column? Or, after reading an answer, do you have a better solution? Send them to jofatech@aicpa.org.


