- column
- TECHNOLOGY Q&A
Power Automate and save hours with Windows 11 tool
Related
Differentiating agentic and generative AI — and more with a Tech Q&A author
How AI is transforming the audit — and what it means for CPAs
Promises of ‘fast and easy’ threaten SOC credibility
TOPICS
Q. I imported a list of clients from another accounting firm into Intuit Lacerte, and now I need to adjust some data on every one of those clients. I could give the list of clients to a staff member to start making the changes, but that’s a lot of manual work. Is there a better way?
A. There is a way and it’s spelled RPA: robotic process automation.
For the uninitiated, RPA is a productivity software technology that can be used to build scripts that many people like to call bots but Microsoft refers to as flows. These flows can mimic human actions such as interacting with software, inputting information, manipulating data, and more. RPA is not an artificial intelligence-powered tool that can learn or hold a conversation, but RPA flows can automate repetitive and routine tasks, freeing up humans to focus on more complex analysis and decision making.
This may sound futuristic or out of reach to some, but RPA is already here. In fact, an RPA tool called Power Automate Desktop is already installed on every Windows 11 operating system. Power Automate Desktop is a low code/no code RPA tool, which means you don’t have to be a programmer to script an RPA flow. Here’s how to find the application and instructions for how I would use it to make the needed changes to the client list imported from Lacerte.
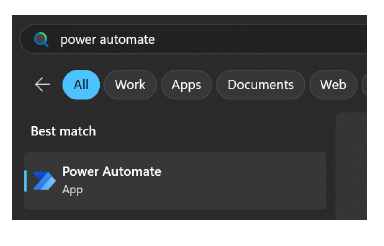
To open the application, go to Windows Start, type in “power automate,” and run a search. The Power Automate application will appear in the results, where it can be opened with a double-click (see the screenshot below).
This is what I would do next. First, log in with my Microsoft 365 credentials to get to my list of flows. Then click on New flow in the top left corner and give my flow a name, in this case “Lacerte Data Change,” as shown in the screenshot below.

When I build a flow, the first thing I do is identify the task and break it down into its most basic parts. For this use case, I want to change the Firm and Preparer in all these clients in Lacerte. To start, I walk through each step to complete the task for one client. I use keyboard commands as often as possible.
- Highlight the first client in Lacerte.
- Press Enter to go into the client.
- Press Enter to go into the client information.
- Press Escape to exit the main input and go to the section area of Lacerte.
- Press Down 10 times to highlight Miscellaneous Info.
- Press Enter to jump down to Miscellaneous Info and enter the main input area.
- Press Tab five times to highlight the Firm Number.
- Press 1 to auto-populate the field with the Firm information.
- Press Tab to go to the Preparer.
- Press 12 to change the Preparer number.
- Press Tab to go to the next input to save the current input.
- Press Escape four times to back out to the client list.
- Press the Down Arrow once to highlight the next client.
Because a flow does exactly what it is told, it is important to map everything out with every detail.
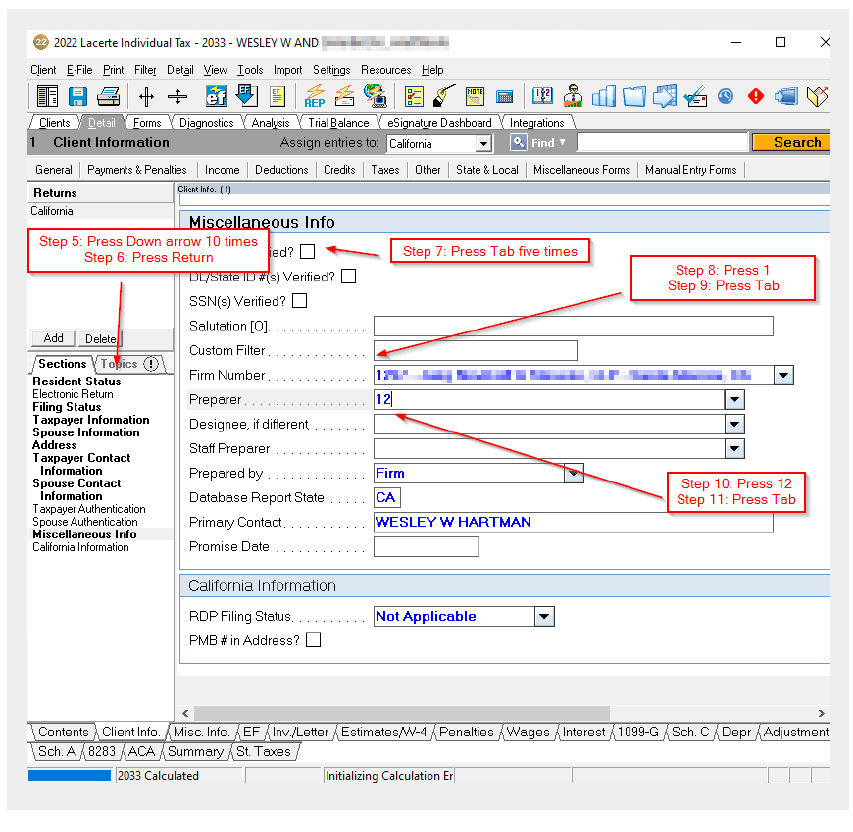
The screenshot below shows where on the screen steps 5–11 take place.
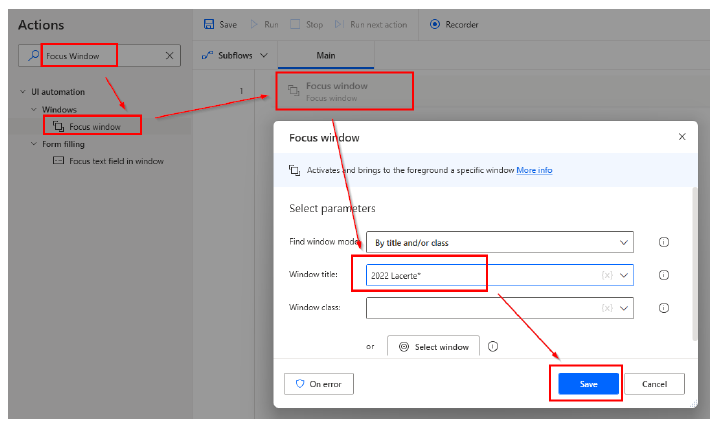
Now that the flow is mapped out, I can start building it. Back on the flow screen, shown in the screenshot below, I start with two actions, Focus window and Send Keys. In the top left, I run a search for Focus Window and drag the Focus Window into the Main area. When the pop-up window appears, I set Find window mode to “By title and/or class” and enter “2022 Lacerte*” into the Window title. The * makes everything after it a wildcard so the flow will ignore the tax type that Lacerte is in. The next step is to click Save to save the properties set for Focus window. This will make the flow search for a window on the computer that starts with “2022 Lacerte.” Once the flow finds the window with “2022 Lacerte” in the Title bar, it activates it (i.e., virtually clicking on it). This also completes step 1.
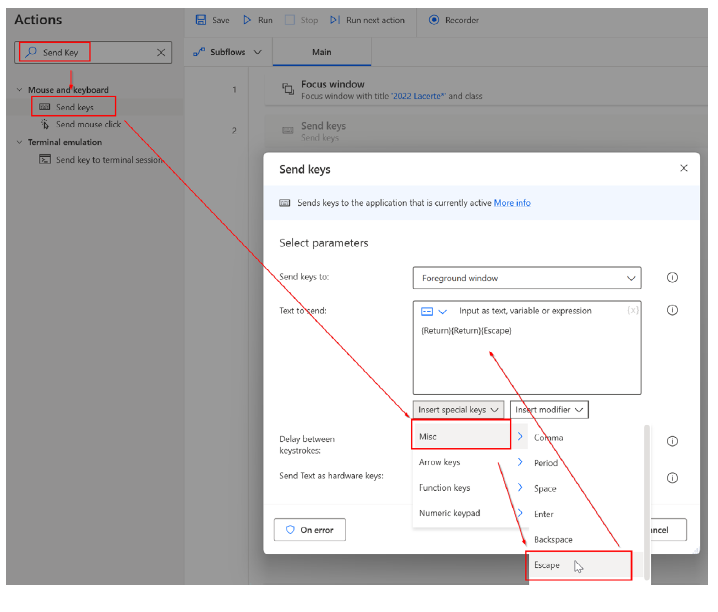
Next, I add Send Keys to the flow. Power Automate Desktop has over 100 actions, so the easiest way to find a specific Action is to do a search. In this case, I run a search on the left for Send keys and drag the Send keys into the Main Area. Then I click on the Insert Special Keys Misc. I add Enter twice and Escape once, as indicated in the screenshot below. This covers steps 2–4.
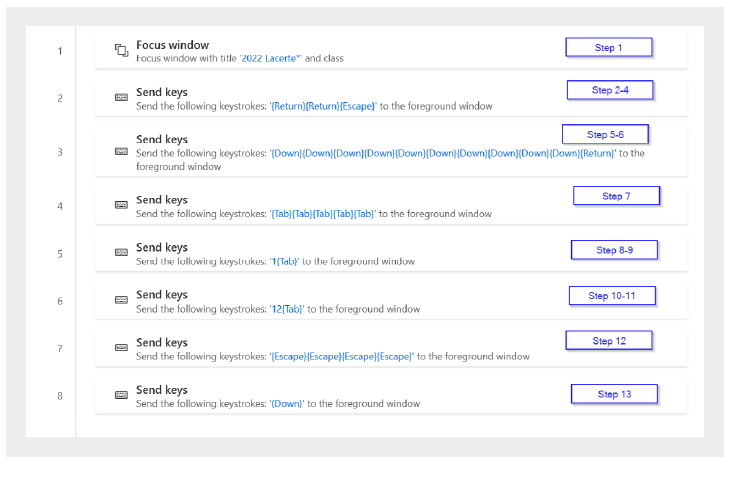
I repeat this with more Send keys to complete the rest of the steps. The flow will look similar to the image below. Each blue box with a step number corresponds to steps in the walk-through I wrote earlier.
Now that I have my flow completing one client, I want to repeat this process for every client. To do this, I use a Loop. I run a search for Loop, then drag it in between rows 1 and 2. In the pop-up window, I enter “1” for the “Start from,” “100” for the “End to,” and “1” for “Increment by” and then click Save. I move the end of the loop to enclose all the Send key actions. This means that the flow will repeat 100 times, each one for a different client.
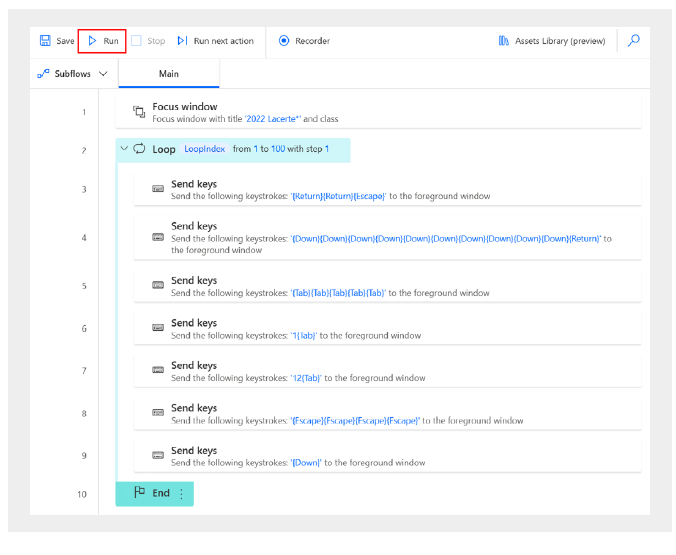
Once my actions are all mapped out, I click Run at the top. The flow follows the actions and makes those changes in Lacerte.
Power Automate Desktop is an easily accessible RPA tool that can create everything from simple flows to complex automations. A handful of actions in the flow can automate hours of repetitive work, freeing up precious time for CPAs and creating capacity for accounting firms.
About the author
Wesley Hartman is the founder of Automata Practice Development and director of technology at Kirsch Kohn & Bridge LLP.
Submit a question
Do you have technology questions for this column? Or, after reading an answer, do you have a better solution? Send them to jofatech@aicpa.org. We regret being unable to individually answer all submitted questions.


