- column
- TECHNOLOGY Q&A
Building RPAs that start automatically
Related
Differentiating agentic and generative AI — and more with a Tech Q&A author
How AI is transforming the audit — and what it means for CPAs
Promises of ‘fast and easy’ threaten SOC credibility
TOPICS
Q. I like the way you used Power Automate to build an RPA in the January Technology Q&A. Is it possible to build RPAs that run automatically when triggered — for example, when an invoice email hits our inbox?
A. Having a robotic process automation (RPA) that runs when an emailed invoice is received is a great use case. Before going into the details, let’s distinguish between two types of RPA: attended flows and unattended flows. Attended flows are automations started by a user. This is also called a manual trigger. The automation built in the January Technology Q&A article “Power Automate and Save Hours with Windows 11 Tool” is an example of an attended flow. A human must click the run button to start the automation.
An unattended flow is triggered by other methods. These methods include:
- When an email is received;
- When a file is created in OneDrive;
- When a row is added to Microsoft’s Dataverse (Microsoft’s data storage);
- When @mentioned in a Teams channel;
- When a response to Microsoft Forms is received; and
- When a certain interval of time has passed — weekly, daily, hourly, etc.
To automatically handle invoices, I would use the first method from above, “When an email is received.” For this example, I want the flow to place any attachments in OneDrive. If the email has no attachment, I want the flow to send me a Teams message saying as such.
Let’s go through the steps I used to build the invoice RPA. To do this, I used the cloud version of Power Automate. Please note that before going into Power Automate, you must create a shared mailbox in your Office 365 environment. If you do not know how to do this, please refer to the Tech Q&A article “Aliases and Shared Mailboxes” from the January 2023 JofA.
I started the RPA building process by creating a Shared Mailbox, accountspayable@automatapracdev.com, and then updating all the vendors that send me invoices via email to send to this new email.
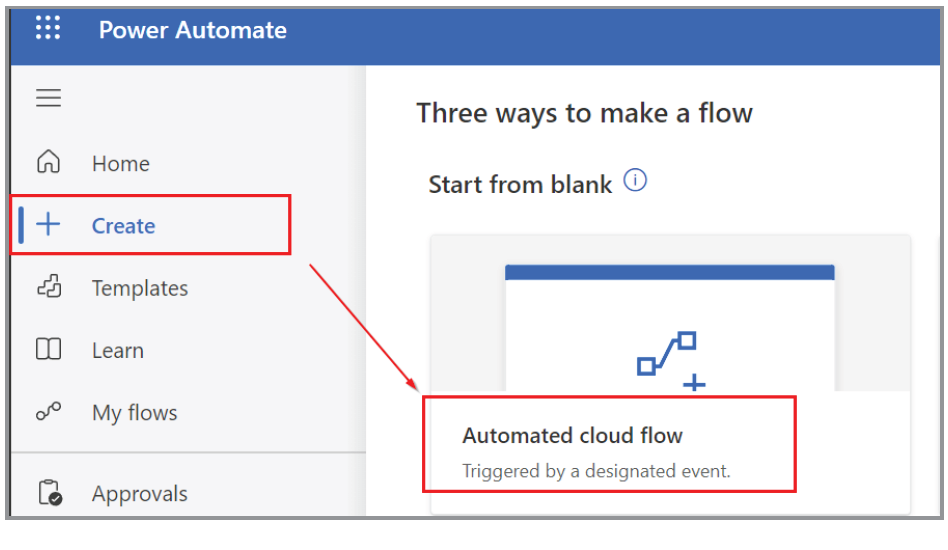
Next, I went to Power Automate at make.powerautomate.com and signed in with my Office 365 account. As shown in the screenshot below, I clicked on “Create” in the left menu, and then chose “Automated cloud flow.”
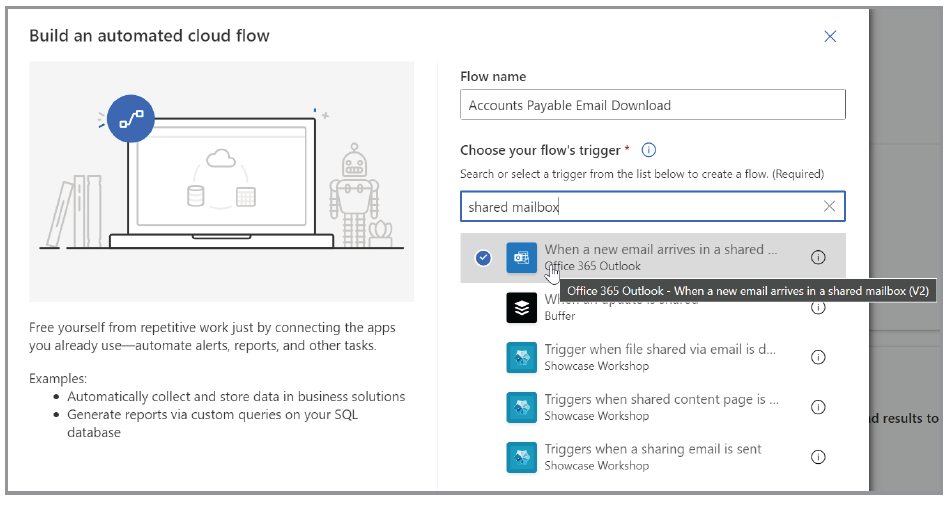
This opened the “Build an automated cloud flow” interface shown in the screenshot below. I am calling my new flow “Accounts Payable Email Download.” In the search box to “Choose your flow’s trigger,” I typed “shared mailbox.” That produced the list of results shown under the search box. The first result is “When a new email arrives in a shared mailbox (V2)” (I had to hover over it to show the full name). I placed a check next to the trigger and clicked “Create.”
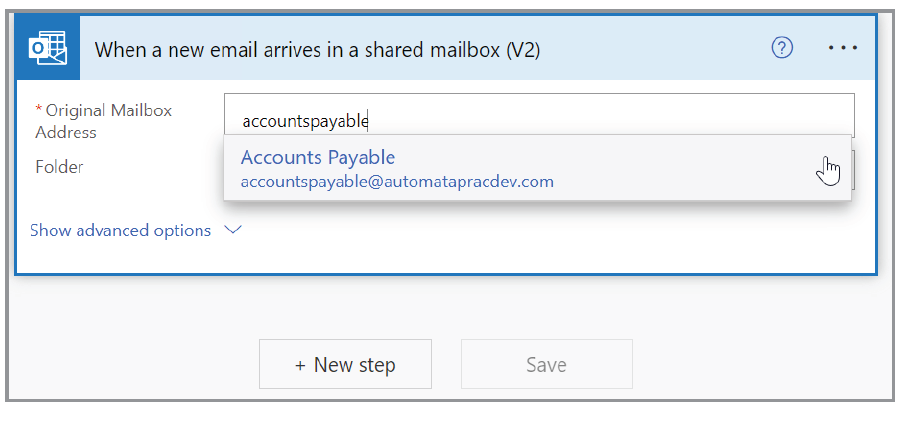
That took me to the editor screen, where I could start to build the cloud flow. With the trigger action being the first action, I wanted to select my new email address for accounts payable. To do this, I typed in part of the email address and then chose the one I wanted from the dropdown list, as shown in the screenshot below.
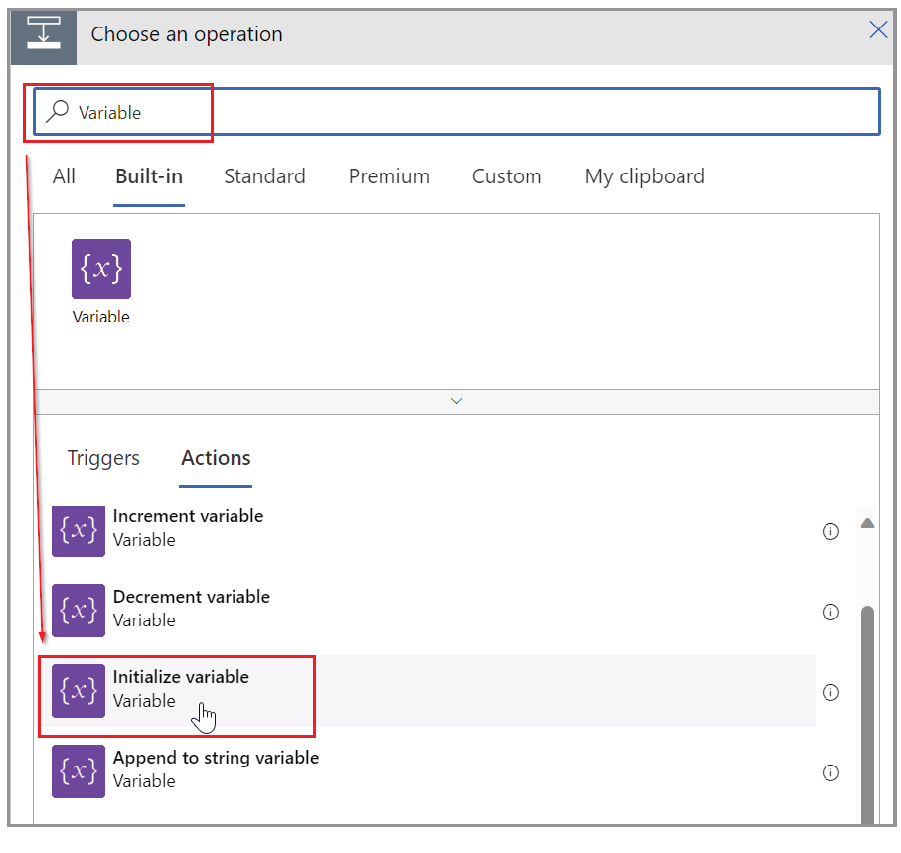
Next, I clicked on “Next step,” which opened the Choose an operation menu, shown in the screenshot below. I ran a search for “Variable” and selected “Initialize variable” from the choices.
This sent me to the “Initialize variable” dialog box. As you can see in the second screenshot below, I gave the variable a name that represents the value I will store, then changed the type to “String.” A string is a way that text can be represented and stored. It can be as short as one character or as long as an entire novel.
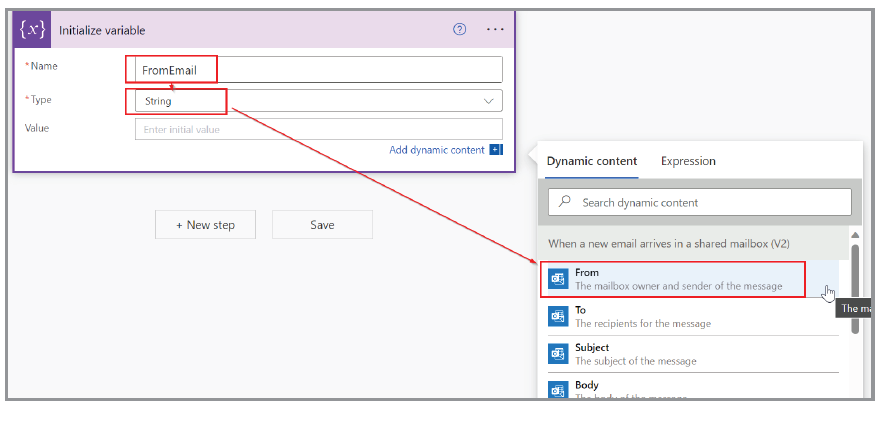
For the Value, I clicked on the input for Value, which opened the add Dynamic Content window. I selected the “From” option. Dynamic Content is information that is generated as part of the flow. In this case, it created options based on the received email.
For the next group of actions, I created a Condition because I want the flow to check if there are email attachments. If there are attachments, then I want it to download them. If there are no attachments, then perhaps the invoice is built into the body of the email or there is a link to download the invoice from the vendor’s website. Both of these situations will require a human to investigate the email to take appropriate steps. In those cases, the flows should notify someone via Teams to review the email.
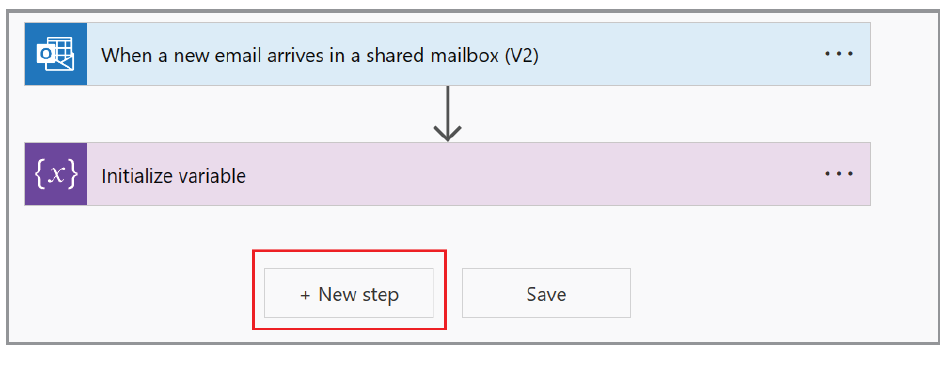
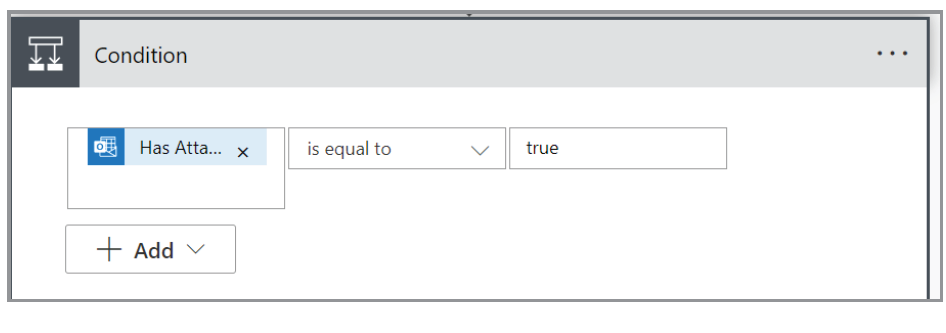
Resuming the build by clicking “+ New step,” I searched for “Condition” and selected it. This created our test and then the actions to take if the result is a “If yes” (true) or “If no” (false). I clicked the first input and from the Add Dynamic Content window, I selected “Has Attachment.” I left the middle dropdown as “is equal to.” For the last input, I typed “true.” It is case sensitive, so I double-checked to make sure it is lowercase.
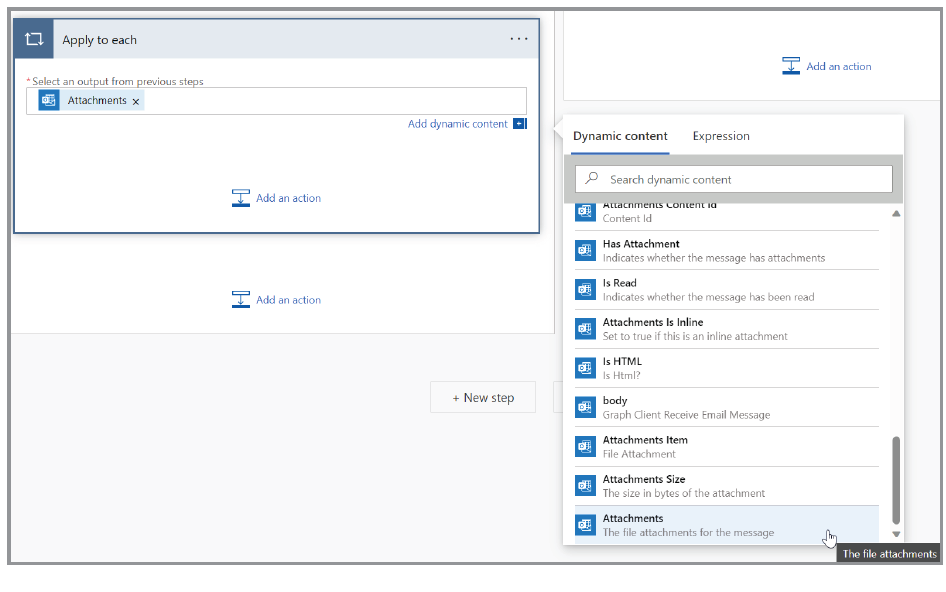
Starting our “If yes” option, I clicked “Add an action,” searched for “Apply to each” and selected it from the menu. In “Select an output from the previous steps,” I chose “Attachments” from the dynamic content, as shown in the screenshot below. When we create actions within the box for “Apply to each,” the flow will apply that set of actions to each attachment in the email.
Next I created the actions that I want for each attachment. I clicked on “Add an action” in the “Apply to each.” I ran a search for “Create file.” I use OneDrive so I selected “Create file” with the OneDrive for Business label.
At this point, I have made a specific folder for invoices. To select it, I clicked on the folder icon and browsed for the folder, “Accounts Payable.” For the “File Name,” I selected “Attachments Name” and for “File Content,” I used “Attachment Content,” as shown in the screenshot below.

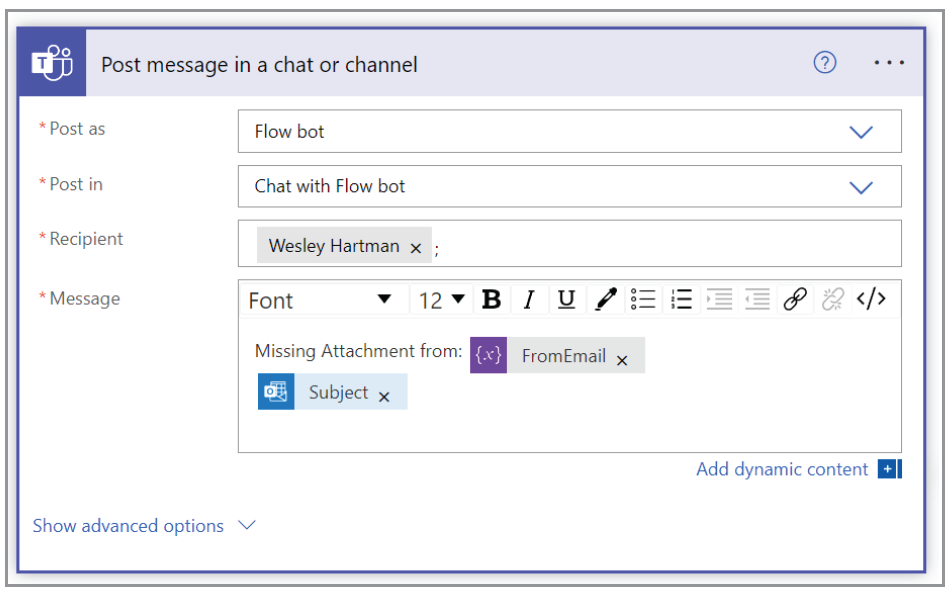
On to the “If no” section. The goal here is to send a chat message if no attachments are found. This would let me know that I need to go download the invoice from the website. To do this, in the “If no” section, I clicked “Add an action,” searched for “Post message” and chose “Post message in a chat or channel,” which opened the dialog in the screenshot below. For “Post in,” I put it to “Chat with Flow bot.” For the recipient, I entered my own email address. For the message, I entered some text and the Dynamic Content for the FromEmail variable and the Subject.
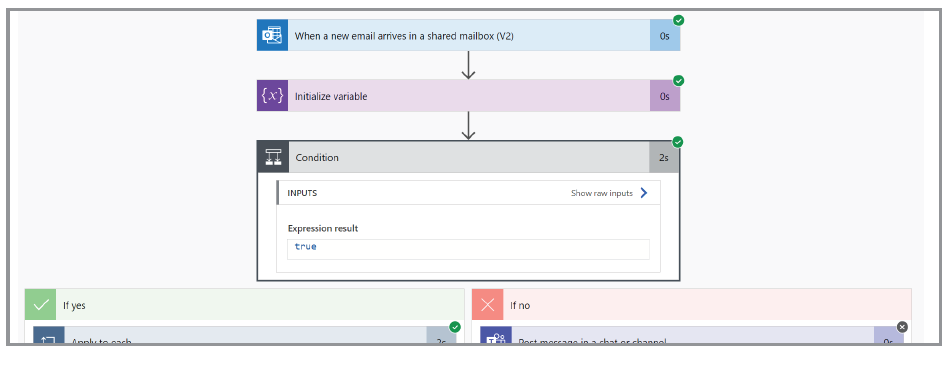
Next, I clicked on Save and then on Test in the top right. I chose the “Manually” bullet and clicked the “Test” button. To test it, I sent an email to accountspayable@automatapracdev.com with an attachment. If you have been following along and get to this point, you should have a successful result. You can click on each step to expand it in the flow. The green checkmarks at the top right of each step show the path that the flow took to the end. As shown in the screenshot below, because the test email had an attachment, the flow chose to go down the “If yes” route..
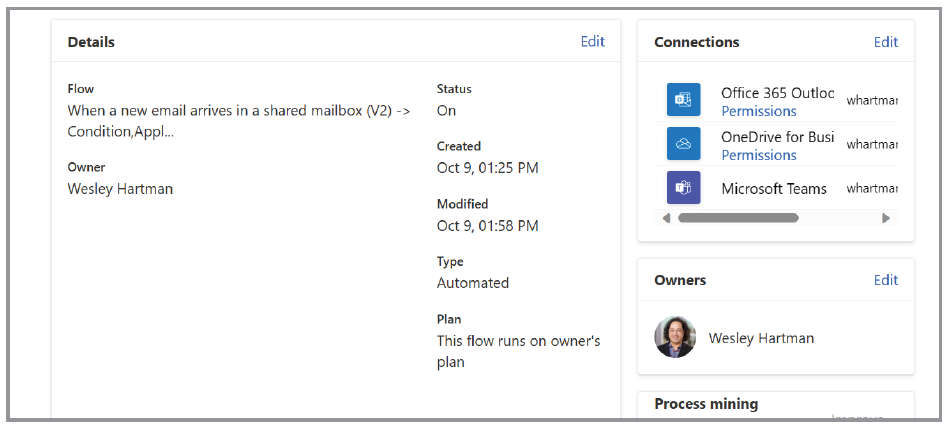
Click on the back arrow in the top left, not the browser back arrow, to get to the details panel, shown in the screenshot below. Here you will be able to see any history and information on this new flow, such as run history. At first, it will be empty because it is newly built, but this will populate as the flow gets triggered with incoming emails to the shared mailbox.
This was a small sample. Other actions can connect to software outside of the Microsoft ecosystem. For example, you can connect to Monday.com for project management, Mailchimp for email marketing, and DocuSign for signature.
You don’t have to use Power Automate to set up an RPA like this one. Other applications, such as Zapier and Make, are worth exploring if you want to try a different interface or if they have connections that are not available on Power Automate.
About the authors
Wesley Hartman is the founder of Automata Practice Development.
Submit a question
Do you have technology questions for this column? Or, after reading an answer, do you have a better solution? Send them to jofatech@aicpa.org. We regret being unable to individually answer all submitted questions.


