- column
- TECHNOLOGY Q&A
Import data from a picture into Excel
Related
Differentiating agentic and generative AI — and more with a Tech Q&A author
How AI is transforming the audit — and what it means for CPAs
Promises of ‘fast and easy’ threaten SOC credibility
TOPICS
Q: We receive documents in paper form, and I have to type information from them into our system. Is there an easier way to digitize this information into Excel?
A: Excel allows you to extract data from a picture. The picture can come from a screenshot, a picture on a website, or a picture you took or have saved on your computer. Let’s walk through a few examples of how to do this.
To follow along, you can download the Excel spreadsheet that I made for this demonstration. This walkthrough and the accompanying video were done using Microsoft 365 for a PC. Other devices may work differently.
Excel allows you to import data from an image. It’s not a perfect method — some information may not translate properly — but Excel prompts you to review data that may not have been converted correctly, and this feature often is still much more efficient and accurate than typing the information into Excel.
Note: PowerQuery can sometimes be used to extract information from an image into Excel, but it often won’t work depending on how the image was created.
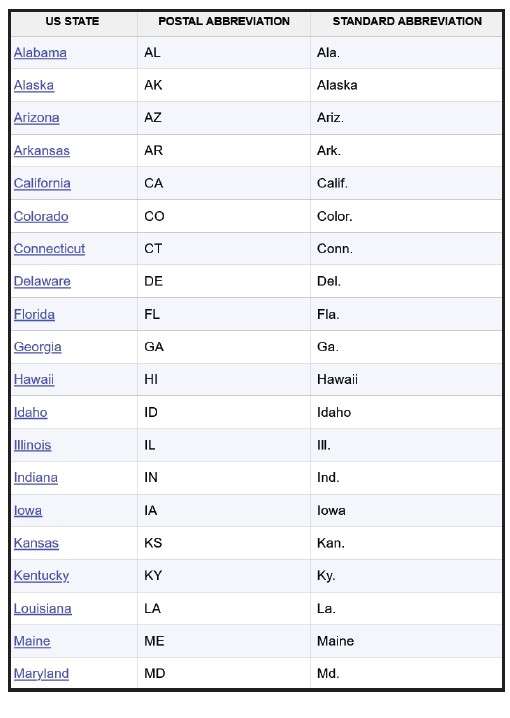
The Excel feature, on the other hand, can work in multiple scenarios. Let’s look first at how to snip an image from a website and then load the information into Excel. For this example, let’s say that we want to create a table of U.S. states with their postal abbreviations. We don’t want to type in all of that information for 50 states, so we go to 50states.com/abbreviations.htm. (Note that the site lists an incorrect standard abbreviation for Colorado.)
A snippet of the image we want to capture from the website is shown in the screenshot below.

To snip an image on a PC, press Ctrl + Shift + S or Windows Key + Shift + S to open the Snipping Tool. Draw a rectangle and select the table that contains the state abbreviations.
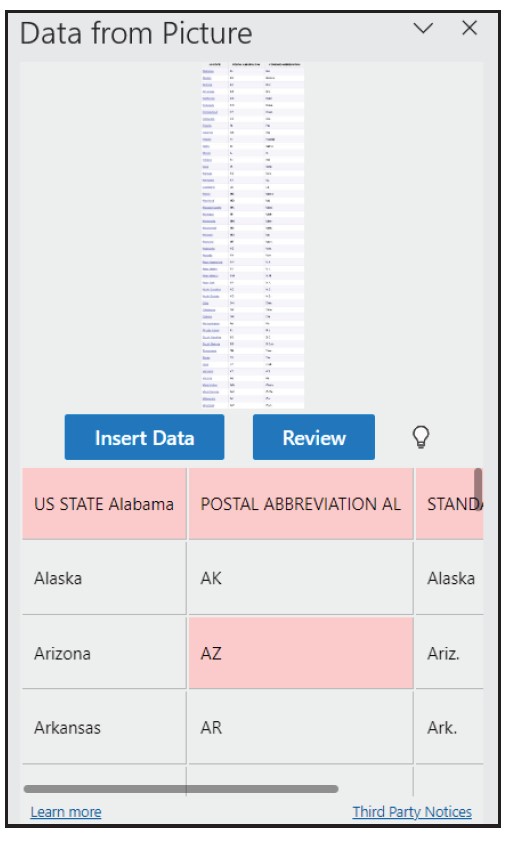
Save the image on your computer. Open an Excel workbook and click the Data tab on the Ribbon. Choose From Picture from the Get & Transform Data group, Picture From File, then browse and select the saved picture. The Data from Picture window will open on the right side of the workbook, as shown in the screenshot below.

As you can see, you have the option to Insert Data or Review. If you click Review, Excel allows you to review individual circumstances where the data may not have been converted correctly. The number of these questionable items will vary depending on the quality of image captured and may not be worth the trouble if there are many. In this case, there weren’t too many so I clicked on Insert Data.
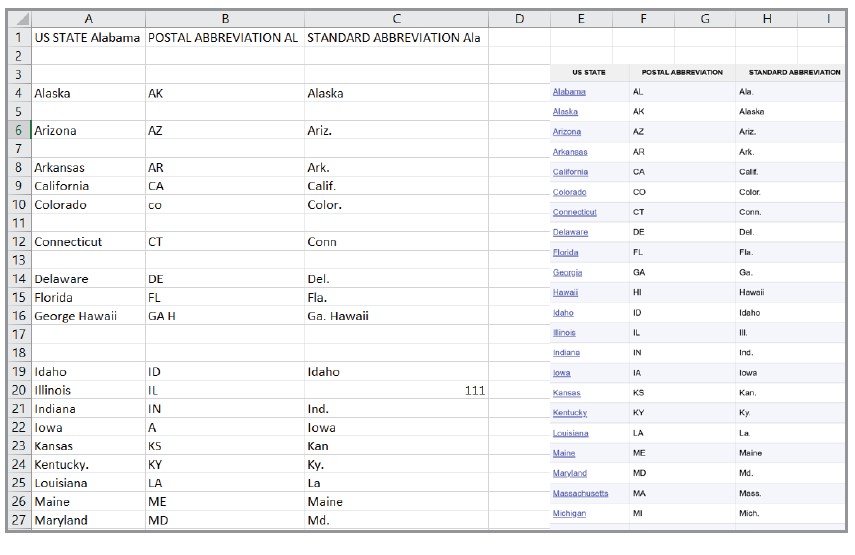
The screenshot below shows what came into Excel from the website image. I also pasted the actual image to the right for comparison and so I could make the necessary corrections. You can see a few things that need to be corrected. These corrections could have also been made directly in the Data from Picture window by choosing Review.

It took only a few minutes to make the corrections, much less time than it would have taken to type all this data into a spreadsheet.
Let’s try this again, but this time using a screenshot sent in an email. See the screenshot below.

Open an Excel workbook and click the Data tab on the Ribbon. Choose From Picture from the Get & Transform Data group. If you saved the screenshot to your computer, choose Picture From File, then browse and select the saved picture. You could have also copied the screenshot, and then you would choose Picture From Clipboard. In either case, the Data from Picture window will open on the right side of the workbook. You can choose Review to see what things Excel may have not converted correctly or choose Insert Data to insert the data and inspect manually. Fortunately, when I imported the image, there weren’t many things to review.
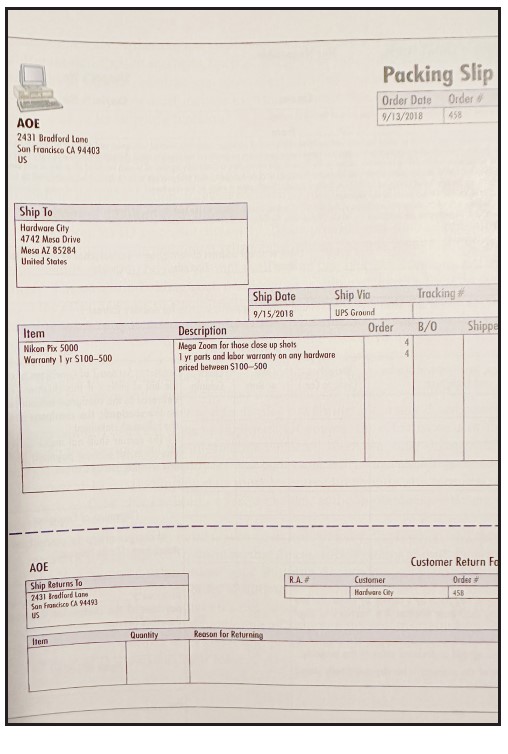
Let’s look at a final example. Instead of using a picture of something from a website or a picture from an Excel document, let’s try to import data from a picture taken of a printed document — in a scenario like what is described in the question for this Tech Q&A item. See the screenshot below of an image of a packing slip we would like to import into Excel.

As before, open an Excel workbook and click the Data tab on the Ribbon. Choose From Picture from the Get & Transform Data group, Picture From File, then browse and select the saved picture. The Data from Picture window will open on the right side of the workbook.
There were more items that needed to be corrected than with the first two examples, and this was probably due to a less clear and formatted picture than the others. But it was still quicker than typing the data in. No matter what data you are importing, just be sure it is correct.
A video demonstration of this process is available at the bottom of this article.
Submit a question
Do you have technology questions for this column? Or, after reading an answer, do you have a better solution? Send them to jofatech@aicpa.org. We regret being unable to individually answer all submitted questions.
About the author
Kelly L. Williams, CPA, Ph.D., MBA, is an associate professor of accounting at the Jones College of Business at Middle Tennessee State University.


