- column
- TECHNOLOGY Q&A
Book appointments more efficiently
Related
Differentiating agentic and generative AI — and more with a Tech Q&A author
How AI is transforming the audit — and what it means for CPAs
Promises of ‘fast and easy’ threaten SOC credibility
TOPICS
Q. One of the most inefficient tasks I do on my calendar is trying to set up a time to meet with a client. We go back and forth sending availability and taking multiple messages before we agree on a time. How can I streamline this process so I can focus on the work?
A. Picking a time on the calendar should be one of the easiest tasks to do but rarely is. Having a calendar packed with meetings and trying to sync up with a client’s crowded calendar means that the first email seldom has a common time slot. This is where I use a calendar sharing application. The idea is to show all my availability so the client can pick an open slot. This concept may feel impersonal when used with a client, but the goal is to make the appointment, not spend effort choosing a time to meet. Additionally, I appreciate it when a client sends me their calendar to select a time. The client has given me all their availability in one screen for me to choose from.
I use the Calendly application. It is straightforward and focused on solving the specific problem of two people selecting an appointment time. Calendly has the added feature of syncing multiple calendar sources with my scheduling page. I use that feature to sync my Microsoft Office 365 work calendar and my personal Google calendar that is shared with my household. This prevents any double bookings between my work and personal calendars. This does require a paid Calendly license of $8 per month, but it is well worth it for the convenience.
I started by going to calendly.com and clicking Get Started in the top right. I signed up with my Microsoft account. Doing so immediately added my Microsoft 365 calendar to the Calendly application. This also let me use my Microsoft credentials to log in to Calendly. Going through the setup process, I left most of the settings as default such as time zone and availability.
Next, I added more calendars to my account. I clicked on my initial in the top right corner and selected Calendar Connections, as shown below.

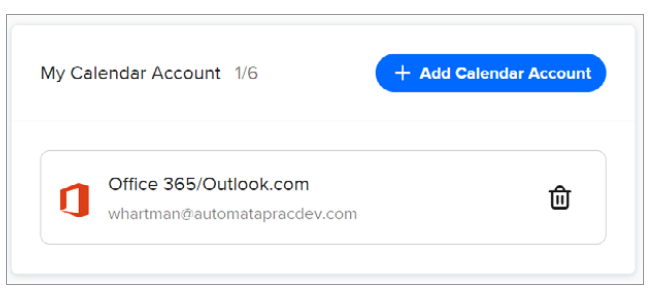
To add my Google calendar, I clicked on the + Add Calendar Account button, as shown below, and selected a calendar type. In my case, I was connecting a Google Calendar, so I clicked that corresponding Connect button. There is the option to connect to other Office 365 accounts as well.

With the $8 Essential plan, I can have two calendars connected. Besides being able to connect two calendars, other features the paid Calendly license include are automated email reminders and follow-ups, adding links back to your website after booking, and chat support. There are higher tiers of licensing that include more features, such as syncing up to six calendars, more automations, more branding options, and integration with other apps like Mailchimp, Zapier, and HubSpot.
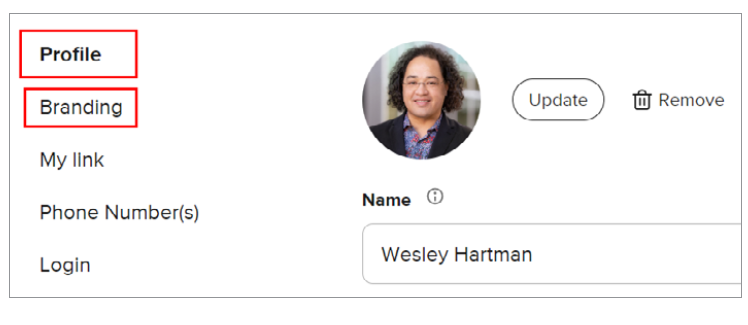
Other settings I changed were adding a profile photo and a logo. I did this by clicking on my initial in the top right and going to account settings. Once in the account settings, I uploaded a photo to the Profile section and my logo to the Branding section, as shown below.

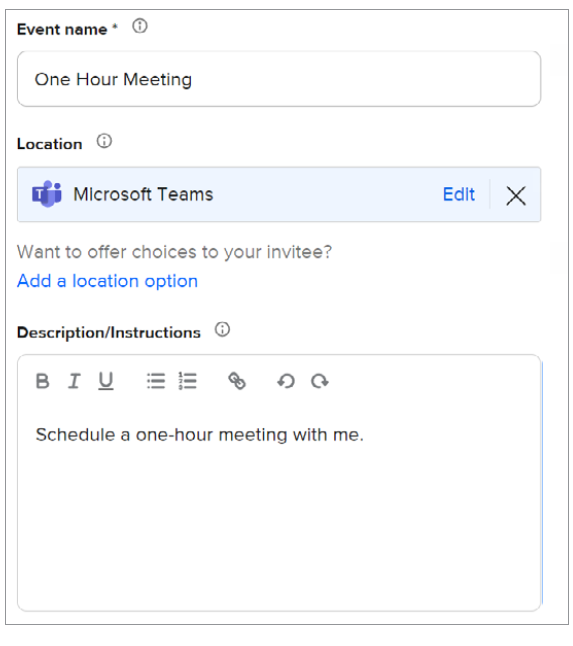
Once I had adjusted my various settings, I was ready to create an event. By default, Calendly makes a 30-minute meeting. I wanted to create a one-hour meeting as an option. On the homepage, I clicked on + New Event Type. On the next page, I used One-on-One as my option and clicked Next. I arrived at the setup page for the event. I gave my event the name “One Hour Meeting,” and I set Microsoft Teams as my location. This is important because it automatically created a Teams link in the invite, as shown below.

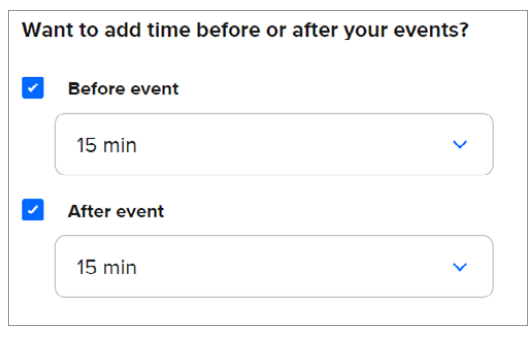
The next page is the scheduling details. I changed two settings here. The first is the duration, which I set to 60 minutes. The second is adding time before and after the event. I turned both on and left them at 15 minutes, as shown below. This is important for me to gather my thoughts before the start of the meeting and write up my notes after the meeting. I do not like having meetings stacked together on my calendar, and this prevents that from happening.

Clicking Next created the event and took me to a page where I could set additional options. Here is a quick breakdown of the additional options that I think are useful:
- Invitee questions: You can add form questions to the invite page. I added a form field for a phone number.
- Workflow: With the Professional license, I can send customized automatic emails depending on action related to the meeting, like a meeting cancellation.
- Notifications and cancellation policy: This also requires a Professional license and sends reminders before the meeting.
- Confirmation page: You can customize the confirmation page. I added a link that will return a person to my website and a link to some automation use case videos.
Back at the homepage, I wanted to use my Calendly page. My primary method is by adding a Calendly link in my email signature. I right-clicked and selected Copy link and pasted the link into the email signature, as shown below.

Finally, Calendly integrates with other products. Some are simple, such as adding or updating contact information in Mailchimp or Salesforce. With a Zapier account, you can connect Calendly with all the applications Zapier has integrations with.
A few other examples of scheduling applications are Microsoft Bookings and Chili Piper. As with any common set of applications, each has its own benefits that the other might not have, or the focused pain point is different. Microsoft Bookings is part of the Microsoft 365 ecosystem. This makes the cost low for some enterprise-level features if you are using 365. With Bookings, I can give the client a list of staff to choose from. The availability list is a consolidation of those staff ’s calendars to give a client more options. This requires a higher-tier license in Calendly, such as a Professional or Teams license. But Bookings is unable to sync to other calendars. Chili Piper is a good tool for sales departments to get prospects with their routing and automation tools. Its focus on sales functions did not fix my specific pain point.
About the author
Wesley Hartman is founder at Automata Practice Development and director of technology at Kirsch Kohn & Bridge LLP.
Submit a question
Do you have technology questions for this column? Or, after reading an answer, do you have a better solution? Send them to jofatech@aicpa.org. We regret being unable to individually answer all submitted questions.


